

November 18, 2026

The Play Store dev console — Google Play Console at play.google.com/console — is where your code becomes a product. The publishing pipeline has a fixed sequence: create the app, upload your bundle, configure signing, complete the listing, clear policy declarations, test, and roll out. Skip or scramble a step and your release stalls in review limbo, sometimes for weeks.
This guide walks the entire pipeline in order, with the exact console paths, the checklists professionals use, and the failure points that catch first-time publishers. For account setup prerequisites, see our Google Play Console account guide.
In short: The Play Store dev console publishing pipeline runs in six stages: create the app and enrol in Play App Signing, upload an Android App Bundle to internal testing, complete the store listing, clear every policy declaration, run 14 days of closed testing with 12 testers on new personal accounts, then roll out to production in stages.
Console path: All apps → Create app.
Enter your app name (changeable later, but pick well), default language, and whether it’s an app or game. Then the irreversible choice: free or paid. A free app can never become paid later — decide your monetization model now.
Console path: Setup → App integrity → App signing.
Upload your upload key (or let Google generate one) and enroll in Play App Signing, where Google holds the final app signing key. Why this matters: if you lose your keystore without enrollment, you can never update your app again — it’s effectively a new app. With enrollment, Google can reset your upload key on verified request. Do this before your first upload, not after.
Note the SHA-1 and SHA-256 fingerprints shown here — you’ll need them for Firebase, Google Sign-In, and API key restrictions.
Console path: Release → Testing → Internal testing → Create new release (start here, not production).
Google requires the Android App Bundle (.aab) format for new apps — APK-only uploads are rejected for new submissions. Build it correctly:
./gradlew bundleRelease produces app-release.aab.versionCode than the last — Google rejects duplicate or lower codes with an unhelpful error.Upload to internal testing first (up to 100 testers, live in minutes to hours) to validate the binary installs and runs. Then promote the same binary through closed and open testing — never rebuild between tracks, or you’re testing a different artifact than you ship.
Console path: Grow → Store presence → Main store listing.
Listing review is separate from app review and usually faster (hours), but it still blocks your release if rejected — submit the listing early, in parallel with testing.
The table below summarises the main listing requirements:
| Field | Limit or requirement |
|---|---|
| App name | 30 characters max |
| Short description | 80 characters |
| Full description | 4,000 characters |
| App icon | 512×512 |
| Feature graphic | 1024×500 exactly |
| Screenshots | Minimum dimensions per form factor (phone, 7″ tablet, 10″ tablet, TV, Wear OS as applicable) |
Console path: Policy → App content.
Every declaration must show complete before production unlocks:
Treat this as a release checklist item, not paperwork — a single incomplete declaration holds the entire release. Our policy compliance guide covers each declaration in depth.
For new personal developer accounts, this stage is mandatory: 14 days of closed testing with at least 12 opted-in testers before production unlocks.
Console path: Release → Testing → Closed testing → Create new release → Manage testers.
Even for accounts exempt from the mandate, run closed → open testing before production. Skipping testing is how broken builds reach millions.
Console path: Release → Production → Create new release.
After launch: monitor Quality → Android vitals and reviews for 24–48 hours. If crash rates spike, hit Halt rollout on the release page immediately — then diagnose, fix, and roll forward with a new release. Never “wait and see” on a crashing rollout; every hour costs ratings.
Review timelines: new apps typically take 3–7 days for first review; updates are usually faster. Never promise a launch date that assumes same-day approval.
If your review stretches past a week, don’t panic — and don’t resubmit (resubmission resets your queue position). Instead:
The most common “stuck review” is actually a reviewer waiting on the developer. Check your inbox before assuming the worst.
Google’s authoritative publishing documentation is the Play Console Help Center — consult it when the console UI changes.
The Play Store dev console pipeline rewards sequence: app signing first, AAB uploads through testing tracks, honest listings, complete declarations, genuine closed testing, and staged production rollouts. Skip a stage and the pipeline stalls; follow it and launches become routine. Save the master checklist and run it for every release — discipline compounds.
The table below summarises the six publishing stages in order:
| Stage | Console path | Key action |
|---|---|---|
| 1. Create the app and configure signing | All apps → Create app; Setup → App integrity → App signing | Enroll in Play App Signing and note the SHA-1 and SHA-256 fingerprints |
| 2. Upload your Android App Bundle | Release → Testing → Internal testing → Create new release | Upload the AAB to internal testing first, then promote the same binary |
| 3. Complete the store listing | Grow → Store presence → Main store listing | Complete the name, descriptions, and graphics; listing review usually takes hours |
| 4. Clear the policy declarations | Policy → App content | Complete content rating, target audience, data safety, privacy policy, and other declarations |
| 5. Run the testing pipeline | Release → Testing → Closed testing | For new personal accounts: 14 days of closed testing with at least 12 opted-in testers |
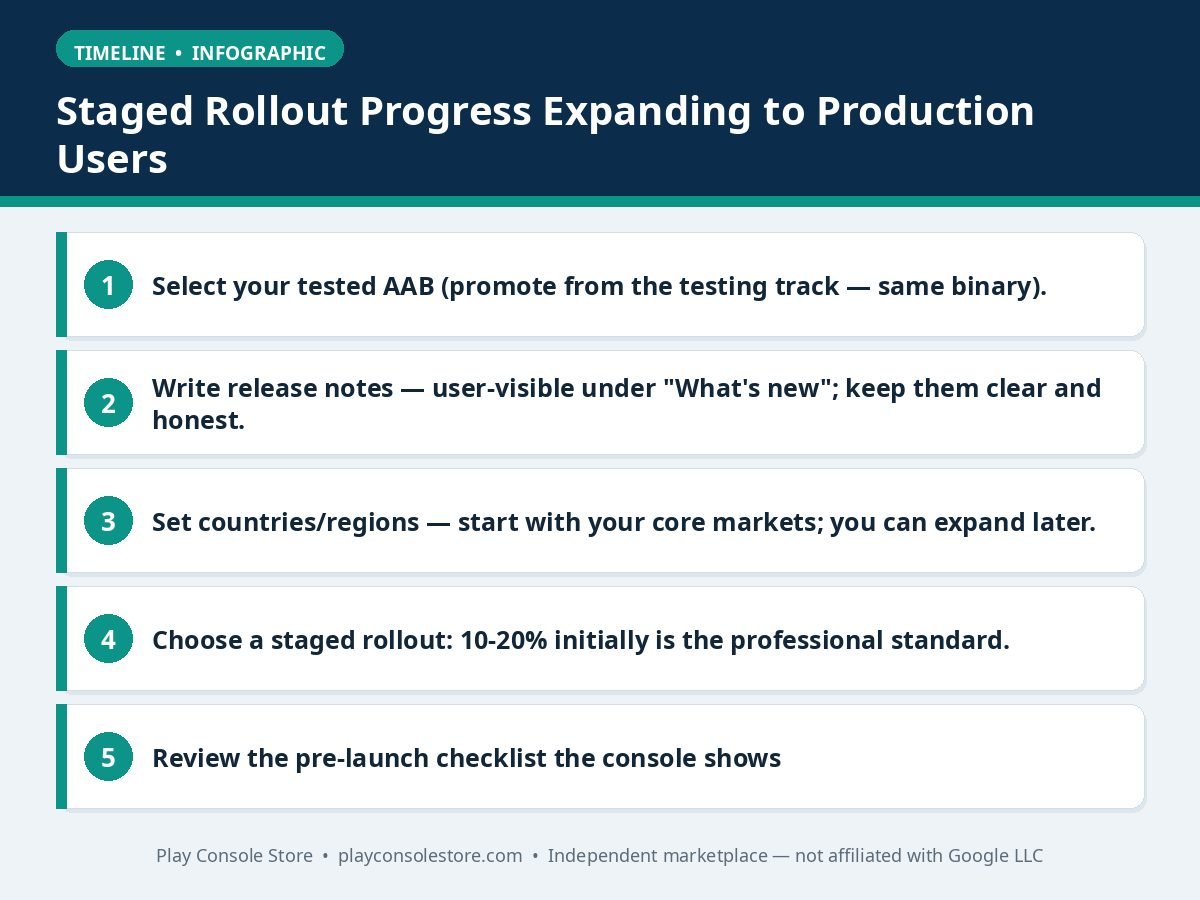
| 6. Roll out to production | Release → Production → Create new release | Promote the tested AAB, start with a staged rollout of 10–20%, and monitor vitals for 24–48 hours |
New apps must upload an Android App Bundle (.aab) — APK-only submissions are rejected for new apps. Build with ./gradlew bundleRelease. Each upload needs a unique, incrementing versionCode.
Typically 3–7 days for a new app’s first review; updates to existing apps are usually faster (often 24–48 hours). Policy reviews can extend either. New personal accounts must also complete 14-day closed testing before production unlocks.
No — a free app can never become paid. (Paid apps can become free.) Decide monetization before your first production release; changing strategy later requires publishing a separate app.
A staged rollout releases your update to a percentage of users (e.g., 20%) before going to 100%. It limits the blast radius of undetected bugs — if vitals spike, you halt the rollout instead of shipping a broken build to everyone.
Go to Policy → App content — any incomplete declaration blocks release. The usual culprits: data safety form, content rating questionnaire, or missing privacy policy URL. Complete them and the release unblocks.
The Play Store dev console pipeline rewards sequence and discipline: sign first, upload as AAB, list honestly, declare completely, test genuinely, roll out gradually. Every launch disaster story — the rejected listing, the stuck review, the crashing 100% rollout — traces back to a skipped stage.
Play Console Store is an independent marketplace that helps Android developers ship through the Play Store dev console — pipeline setup, release management, and launch checklists. Explore our Google Play services and launch like a professional studio.